Run Cloud Window in your own AWS account
Where things stand
You can set this up today, in your own AWS account, without asking anyone. The Deploy to your AWS account button creates your private dashboard in about five minutes; from there you create the computer, connect it to your Tailscale network, and open the desktop in Moonlight. The public image is ami-0bf6e8e0eb45ef6dd in Oregon: a neutral Omarchy image built from the official installer onto a blank disk, boot-tested on a GPU instance, and searched for personal data before release. The NVIDIA GPU driver is not inside it; your computer fetches it from AWS on first boot inside your own account, for a reason explained below. If you get stuck, or would rather have a hosted computer, send a direct message to SeekingGradient on X.
What it is
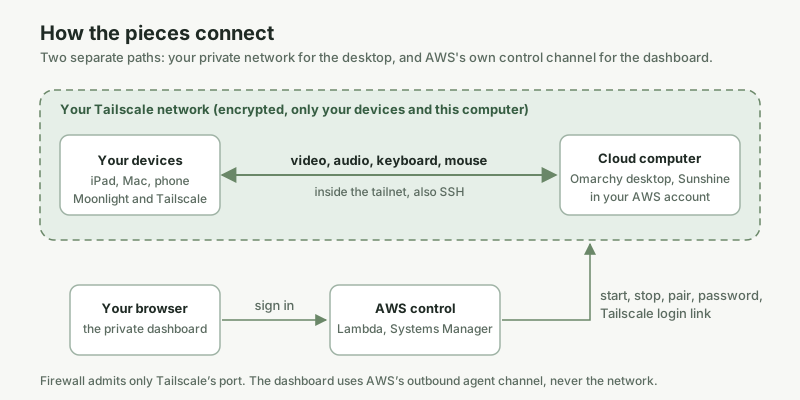
Cloud Window is one Omarchy Linux desktop on a GPU virtual machine in your AWS account, streamed to your Mac, iPad, iPhone or Android with Moonlight over your own Tailscale network. A small private website, deployed into the same account, starts and stops the computer, shows the Tailscale enrollment link, and pairs your Moonlight devices. Your saved files stay on the disk across stops; open applications and memory do not.
The same setup will run on a Linux machine you own at home. The image's neutral layer is the starting point for that variant, minus the AWS driver and agent, and a home guide will follow once the AWS flow is released.
What you need
- An AWS account you administer. Sign in to the console as an administrator; avoid the root user where you can.
- The Oregon region (us-west-2). The preview refuses other regions.
- GPU quota in Oregon: at least four "Running On-Demand G and VT instances" vCPUs (quota code L-DB2E81BA). New accounts start at zero. Request it here; approval usually takes hours. You can deploy the dashboard while you wait; creating the computer needs the quota.
- Your own Tailscale account. Cloud Window never bundles, resells or provisions Tailscale. You install Tailscale on your devices and enroll the cloud computer into your own network, under Tailscale's terms.
- Moonlight on at least one device, with Tailscale on the same device.
- Only if you prefer the terminal path: AWS CloudShell, or AWS CLI v2 with Python 3.10 or later and the boto3 library.
How the image is made
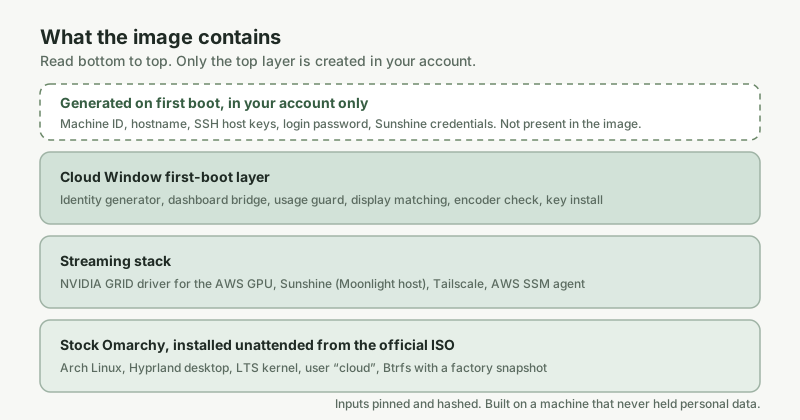
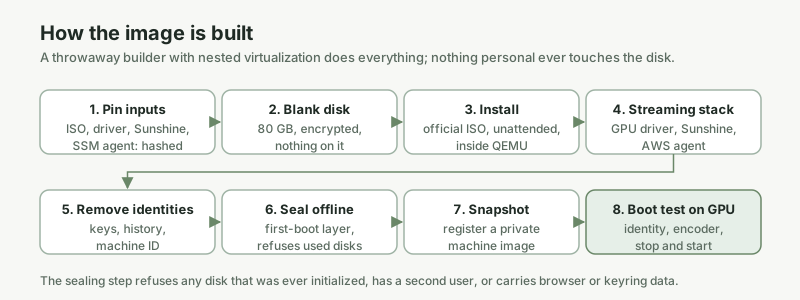
The image is built from the official Omarchy installer onto a blank disk by a throwaway machine that has never held personal data. Every input is pinned to a version and checked against a known hash. Before the disk becomes an image, every identity the build created is removed, and a sealing step refuses any disk that was ever initialized, has a second user, or carries browser or keyring data. On first boot in your account the computer generates its own machine identity, host keys, password and streaming credentials.
One thing is deliberately not in the image: the NVIDIA GPU driver. AWS distributes that driver to each AWS customer under a license that does not allow passing it on, so the image cannot contain it. Instead, the first boot downloads the exact pinned driver version from AWS's own bucket using your instance's credentials, verifies its checksum, and builds it for the kernel. That adds a few minutes to the very first boot and nothing afterwards. The dashboard gives the computer the permission it needs automatically; if you launch the image by hand, see the note under Launch the image without the dashboard.
Deploy the dashboard
Open the Deploy to your AWS account page, enter the email address that will own the dashboard, and click Deploy to AWS. The AWS console opens in your account with the Cloud Window stack pre-filled: stack name cloud-window, region Oregon, the public image, your email. Tick the acknowledgement that the stack creates IAM roles, then click Create stack. It takes about five minutes.
What the stack creates: a private website behind CloudFront, a sign-in for your email only, a small function that starts and stops your computer, a state table, a network, an instance role that can read AWS's GPU driver, and a scheduled usage guard. It does not start a computer. The template is public, so you can read exactly what it does before you create it; the deploy page links to it.
Within a minute, AWS emails you a short subscription confirmation; click its confirm link so your own account can email you when the stack finishes. When the stack shows CREATE_COMPLETE you get "Your Cloud Window dashboard is ready" with a one-click link: it opens the Your computers page on this site and adds the new computer to your list. Sign in there once and the computer follows you to any device; without signing in it is remembered in that browser only. Your stack also hosts its own copy of the dashboard, listed under the stack's Outputs tab as Website, which works even if this site is down.
From a terminal instead
The same deployment is available as commands, for people who want to see every step or script it. Download the developer kit, unpack it, and run the commands from the kit directory. Inside AWS CloudShell use --profile cloud-shell; elsewhere replace the placeholders with your own values.
Check prerequisites without creating anything:
python3 infra/aws/preflight.py --profile YOUR_PROFILE --account-id YOUR_12_DIGIT_ACCOUNT --zone us-west-2a --ami ami-0bf6e8e0eb45ef6dd
Deploy the dashboard, create the computer and install the helpers in one pass; rerunning it with the same arguments resumes rather than duplicates:
python3 infra/aws/setup.py --profile YOUR_PROFILE --account-id YOUR_12_DIGIT_ACCOUNT --owner-email YOUR_EMAIL --ami ami-0bf6e8e0eb45ef6dd
The kit also contains the scripts that build the image itself, so you can rebuild it from the same pinned inputs in your own account if you would rather not trust ours.
Connect
1. Create the computer
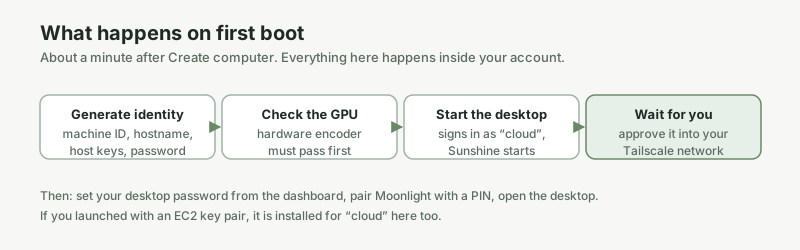
Open the computer from Your computers (or from your stack's own address), sign up with the email address you gave at deployment, and confirm the verification code. Check the monthly budget under Settings, $20 by default, then click Create computer. AWS bills the instance from this point while it runs. The first boot generates the machine's identities, fetches and builds the GPU driver inside your account, and runs a hardware-encoder check on the real GPU; expect five to eight minutes before the dashboard reports the desktop as ready. If the GPU quota has not been granted yet, the dashboard says so instead of creating anything.
2. Enroll it in your Tailscale network
Install Tailscale on your devices and sign in to your own account. When the dashboard shows Connect to Tailscale, open the link and approve the cloud computer into that same network. Until you do, nothing can reach the desktop. You can review or remove the machine any time in your Tailscale admin console.
3. Pair Moonlight
Install Moonlight on each device you want to use. On iPhone and iPad use the App Store link on the dashboard. On Android download the APK from the Assets section of the official release page and allow installation from that source only while you install it. On Mac install Moonlight; the Cloud Window companion for the Mac is an optional separate download.
In Moonlight, add a computer and enter the private address shown in the dashboard under Connect a device. Select the computer; Moonlight shows a four-digit PIN. Type that PIN and a device name into the dashboard. Each device pairs once, and paired devices are listed on the dashboard.
4. Set your desktop password and open the desktop
While the computer is running, open Connect a device and use Set or reset your desktop password. Use 12 to 128 characters. This password unlocks the Omarchy screen and approves administrative actions inside the computer; it is separate from your dashboard sign-in. The interactive infra/aws/setup-password.py is an alternative if you would rather not type it in a browser.
Then open the desktop from Moonlight. On iPad and iPhone choose Native (Full-Screen) and set frame rate and bitrate in Moonlight. On Android set the resolution, frame rate and bitrate in Moonlight. On the Mac the companion applies the stream settings from the dashboard. The desktop adjusts its size to the connected device.
5. Shell access
The Linux account is named cloud. Once the computer is enrolled, Tailscale SSH is enabled on it, so from any device on your tailnet you can run ssh cloud@ followed by the computer's Tailscale address, authenticated by your Tailscale identity. No port is open to the internet and no key pair is needed. If your tailnet policy asks you to re-authenticate the first time, that is Tailscale's default check for SSH.
If you want an ordinary SSH key as well, add a public key to /home/cloud/.ssh/authorized_keys from a Tailscale SSH session or the desktop terminal. The computer's SSH daemon accepts keys only and is reachable only over Tailscale. Computers created from the dashboard attach no EC2 key pair and do not need one; administrative actions inside them use the desktop password you set.
Launch the image without the dashboard
If you would rather not deploy the dashboard, you can launch the image directly from the EC2 console and manage it by hand once an image is available to you. You lose the start and stop buttons, the pairing form and the usage display, but the computer is the same.
- In the EC2 console, in Oregon, launch an instance from
ami-0bf6e8e0eb45ef6ddong6f.xlarge. Choose or create a key pair; the first boot installs it forcloudand, because you hold the launch key, grantscloudadministrative rights without a password, the same as the default user on any cloud image. Attach an IAM instance profile whose role allowss3:GetObjectonarn:aws:s3:::ec2-linux-nvidia-drivers/*so the first boot can fetch the GPU driver. If you skip the role, the desktop starts without the GPU; download the driver yourself withaws s3 cp s3://ec2-linux-nvidia-drivers/grid-19.5/NVIDIA-Linux-x86_64-580.159.03-grid-aws.run ., copy it to the computer, and runsudo cloud-window-install-driver --file NVIDIA-Linux-x86_64-580.159.03-grid-aws.run, then reboot. - Give it a security group that allows inbound UDP 41641 from anywhere and nothing else, a public IP, and an 80 GiB encrypted disk. The image itself is not encrypted; tick encryption on your disk.
- Connect with your key:
ssh -i YOUR_KEY.pem cloud@PUBLIC_IP. Runtailscale up --ssh, open the link it prints, and approve the machine into your tailnet. Theclouduser is the Tailscale operator, so this needs nosudo. After enrollment you can drop the public IP and reach it over Tailscale only. - Set the desktop password with
sudo passwd cloud. This unlocks the Omarchy screen. - Pair Moonlight through Sunshine's own web page, which listens only on the computer itself. From your machine, open a tunnel:
ssh -L 47990:localhost:47990 cloud@TAILSCALE_ADDRESS, then browse tohttps://localhost:47990, accept the self-signed certificate, and sign in ascloudwith the password in/home/cloud/.config/sunshine/admin-passwordon the computer. Enter the PIN Moonlight shows under the PIN tab. - Open the desktop from Moonlight as in step 6 above. The usage guard still applies: one hour without a stream and the four-hour check-in stop the computer; stop and start it from the EC2 console.
Before you store anything you care about: pair one device, create a file, stop the computer from the dashboard, start it again, and confirm the file and the pairing are still there. Then take a backup and test restoring it.
Costs and automatic stopping
AWS bills your account directly. The figures below are estimates for Oregon, not a quote. The cost calculator uses the same rates and lets you model your own hours and bitrate; check current AWS prices and compare with your bill.
| Item | Amount | Notes |
|---|---|---|
| Running hour | about $0.2425 | g6f.xlarge including the IPv4 address. Stopped compute is not billed. |
| Disk | about $6.40 per month | 80 GiB gp3, encrypted, kept when the computer stops. Billed while it exists. |
| Outbound traffic | about $0.09 per GB | The desktop stream is outbound traffic; at 12 Mbps an hour is roughly 5 GB. Higher bitrate costs more. |
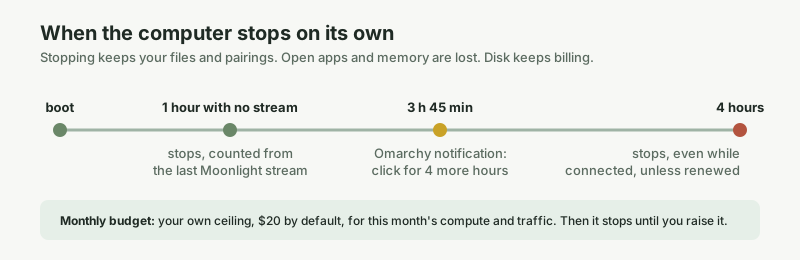
| Monthly budget | $20 by default, editable any time under Settings | Your own ceiling for the estimated compute and streaming traffic of this computer in a calendar month (UTC). When it is reached the computer stops and stays stopped until you raise the budget or the month turns over; files are kept. |
| No desktop stream | stops after 1 hour | Counts from the last stream. An SSH session or background job does not keep it running. |
| Four-hour check-in | stops at 4 hours | At 3 hours 45 minutes a notification in Omarchy asks you to keep running. Click it to get another four hours. Ignored, the computer stops even while you are connected. |
The dashboard shows the usage so far, the estimated cost and the next check-in deadline under Usage and limits and Stream settings. The budget covers the computer's running time and streaming traffic; the disk, snapshots and the management stack are billed on top. Traffic measurements lag a few minutes, so the budget is a ceiling on an estimate, not an instantaneous account-wide cap.
Known limits
- Oregon only, one account and one computer per deployment.
- No browser streaming; Moonlight is required. No suspend that preserves memory.
- The public image is unencrypted by design so that it can be public; your own disk is encrypted at launch.
- Omarchy is a rolling distribution. Updates inside the desktop can affect the driver and screen capture.
- The Mac companion is ad hoc signed, Apple silicon and macOS 14 or later, and not notarized.
- The image is new. It has passed first-boot, driver-install, encoder and stop/start tests on a GPU instance, but few people outside the project have used it yet; treat this as a developer preview.
Cleanup
Stop the computer from the dashboard when you are done. The disk keeps billing while it exists. To retire the installation: back up and export your files over Tailscale, take an encrypted snapshot if you want one, then in the AWS console find the tagged instance and its retained root volume, disable termination protection, terminate the instance, and delete the volume separately. Delete any images and snapshots you own that you no longer need, empty the installation's site and artifact buckets, and delete the CloudFormation stack. Remove the machine from your Tailscale admin console. Deleting only the stack is not a complete teardown. The kit does not include a blanket account cleanup command on purpose.
For operators
The material for people preparing or validating images has moved out of this guide. docs/image-release-process.md covers sharing an image into another account. docs/validation-record.md lists the first-boot and finishing checks and their limits. infra/aws/fresh-image-check.py launches a billable disposable GPU instance to run those checks against an image in your account and removes its own tagged resources. infra/aws/finish-setup.py reinstalls the current guest helpers on a running computer over SSM when the kit ships a newer release than the image contains.
Sources: AWS image sharing, Tailscale encryption, Tailscale terms, Moonlight, Sunshine.